Hello, How are you? Over at Lasting Memories this week's challenge is really exciting! It is to use distressing on your layout. Here is my layout-
This picture is from Cornwall a few years ago. The paper has a great distressed edge, it is from We R Memory Keepers. I took some chipboard from Heidi Grace Designs. I inked them in blue ink from Papermania, and stamped a flourish and edged the letters in black ink. I mounted the photo onto black card, and added some black stones to the corners. I ran a tape runner all along the blue ribbon and stuck it across the bottom. I stamped the journaling tag on some cream card and cut it out.
Thanks for stopping by!!
Sunday, 17 July 2011
Thursday, 14 July 2011
My Pink Stamper Design Team Call!
I am very excited about the design team call over at My Pink Stamper!! I am a BIG fan, I love Robyn's videos and her projects. I have been thinking about what I might do for the design call since I saw a comment about it on her website, which is nothing like what I have ended up doing!! The challenge is to use the colours-Orange, Turquoise, Green & Brown. So here is my entry-
I have used-
Stamps: My Pink Stamper set- Family & Friends
Paper and cardstock: We R Memory Keepers- Vintage Blue
Flowers: Prima Flowers
Buttons: Woodware
Ribbon: Craft
Cricut Cartridges: Plantin SchoolBook, Once Upon A Princess
Brown ink
Adhesives
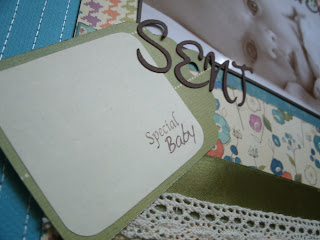
I love this cardstock, it already had the stitching on it. I cut the patterned paper to fit inside the middle square, and tore the bottom edge. I stuck green ribbon and crocheted ribbon along the bottom. I cut the title from Once Upon A Princess, at 1 1/4" in brown card. I added some scraps of patterned paper that I had left over from the set. For the tag, I cut it out from Plantin at 3 3/4", and cut a small piece of cream card and stamped 'special' from 'something special' and 'baby' in the bottom corner. I just need to add some journaling to this tag. Finally I added some flowers with buttons on them.
I love these pictures of my baby girl! She was only a month old when these were taken. She really is a special baby, she never should have come home from the hospital. But through the power of prayer she is healthy and with us! She is such a blessing to our family!!
Thank you for stopping by!!
Getting Scrappy Challenge.
Hello, I have a layout to share with you this afternoon for the Getting Scrappy Challenge, this week it is a photo inspiration-
Here is my LO-
I used a phrase from Once Upon a Princess, cut at 4 3/4". The paper is from Colorbox. This is a picture of my son and husband singing at a Primary talent show at church.
Thanks for stopping by!
Here is my LO-
I used a phrase from Once Upon a Princess, cut at 4 3/4". The paper is from Colorbox. This is a picture of my son and husband singing at a Primary talent show at church.
Thanks for stopping by!
Wednesday, 13 July 2011
Where have I been??!!
Hello! I have really missed doing posts!! I have been so busy, my daughter turned 2 on Monday, we had a big family and friends party last Saturday. All of last week I was so busy getting ready for it and didn't have anytime to do anything. I wasn't even able to do my post for Lasting Memories. But things have finally calmed down a bit, so this evening I have spent some time doing the challenge. This week this challenge is to use mosaic on a layout. Here is my LO, these pictures are of my son playing in a fountain in London last summer. They were all so cute it is hard to choose just one!
I used American Crafts paper and letter stickers. I cut out a tab from 'From my Kitchen' cartridge and the stamp is from My Pink Stamper. I added some buttons. I just need to add some journaling.
Thank you for stopping by!
I used American Crafts paper and letter stickers. I cut out a tab from 'From my Kitchen' cartridge and the stamp is from My Pink Stamper. I added some buttons. I just need to add some journaling.
Thank you for stopping by!
Monday, 4 July 2011
Fantabulous Cricut-Challenge Me Monday!
Good Morning! It is a lovely morning here, I think summer has finally started...fingers crossed!! This morning I have my post for Challenge Me Monday at Fantabulous Cricut! This week the challenge is Pool Time-to use water on a project. Here is my card-
I used Plantin SchoolBook and Design Studio to make the heart card. I used the heart, it is about 5" and a small rectangle to join 2 hearts together. I flipped the second heart and welded it all together. On the same mat I also had 2 hearts to use for layers. The stamp is a Belles 'n Whistles coloured with Promarkers. I knotted a piece of American Crafts ribbon on the side and stamped a 'fun' from a MPS set.
I am looking forward to seeing what you can do with this challenge!!
Sunday, 3 July 2011
Lasting Memories Challenge-Summer Mini Album.
Hello, I have my mini album to share with you today for the Lasting Memories Challenge to make a summer mini album. I have used some pictures from a picnic we had a few weeks ago. Here is what I used-
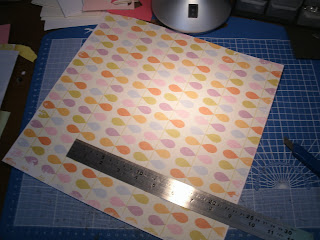
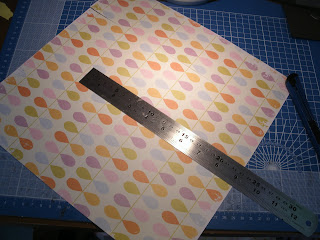
I used one sheet of 12"x12" paper, it is best to use a double sided sheet. This paper is from We R Memory Keepers scored every 3", then I turned the paper and scored again every 3", making squares.
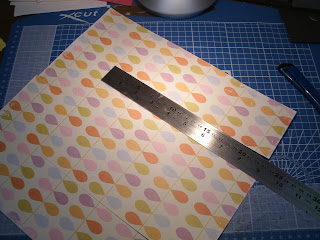
Then cut along the score lines, starting with the first score line cut from 3" down, turn the paper the other side and cut from 3" down again, and finally turn back to the first side and cut the last score line, again from 3" down. This will make a 'm' shape.
Begin concertina folding the squares to make a little book. TIP: fold with the side you want to be the pages on the inside.
Next you can cut corners from some of the squares to make pockets, and also cut 3 sides of a square to make a flap-
The next thing is to decorate the pages. I used bits of ribbons, buttons and pearls. I also used stamps to add messages throughout the book.
To make the covers, take 2 3 1/4" Squares of chipboard and cover this with coordinating papers.
To put the book together, take a length of ribbon and line it up along the middle of the covers, leave a gap between the covers of about the same thickness as the pages (I accidently deleted the picture of this-sorry!) and enough ribbon on either side to tie it all closed , then stick the pages to the front and the back covers.
Thank you stopping by!!
I used one sheet of 12"x12" paper, it is best to use a double sided sheet. This paper is from We R Memory Keepers scored every 3", then I turned the paper and scored again every 3", making squares.
Then cut along the score lines, starting with the first score line cut from 3" down, turn the paper the other side and cut from 3" down again, and finally turn back to the first side and cut the last score line, again from 3" down. This will make a 'm' shape.
Begin concertina folding the squares to make a little book. TIP: fold with the side you want to be the pages on the inside.
Next you can cut corners from some of the squares to make pockets, and also cut 3 sides of a square to make a flap-
The next thing is to decorate the pages. I used bits of ribbons, buttons and pearls. I also used stamps to add messages throughout the book.
To make the covers, take 2 3 1/4" Squares of chipboard and cover this with coordinating papers.
To put the book together, take a length of ribbon and line it up along the middle of the covers, leave a gap between the covers of about the same thickness as the pages (I accidently deleted the picture of this-sorry!) and enough ribbon on either side to tie it all closed , then stick the pages to the front and the back covers.
Finally decorate the front cover, I used some American Crafts Ribbon and Papermania stickers
Here are a few pages-I just need to add some journalling-Thank you stopping by!!
Friday, 1 July 2011
Party Invitations
Hello, My baby girl is 2 this month! I can't believe how fast it has gone. She is the sweetest, most loving girl. I am very excited for her birthday! Last night my husband's cousion (and one of my good friends) helped me make these cute little invites for her party. The cupcake is from Doodlecharms and I cut the envelopes from Cricut Sample. The cards are 3" squares, the paper is from We R Memory Keepers.
Thanks for stopping by!
I have entered this into Cricut 360 challenge to make a invite!
Thanks for stopping by!
I have entered this into Cricut 360 challenge to make a invite!
Subscribe to:
Posts (Atom)


